
In this tutorial, we will be using firebase phone authentication in android to authenticate our users and let them Sign-up or Log-in to our app.
Previously, we have created our design for the sign-up and will use the same design for this tutorial. After validation user will be directed to the Verification screen to verify the code (OTP).
Firstly, we will send the verification code or the OTP(One Time Pin) on the user’s phone.
If the user is using the same device which receives the code then code will automatically be verified.
On the other hand, the user will have to manually write the code by him/her self and click on the verify button to verify the code.
After successful verification, the user will be directed to Profile Screen or to the Login Screen, depending on the requirements.
Firebase Authentication
There are many types of apps that need to store their user’s data but they also want to avoid scams and As a result, people have to use authentication.
However, authentication means calling some third-parties to verify users data which will be costly moreover for the developers, it’s a time-taking and too complex to code.
Therefore, firebase auth plays a part which makes this whole process so easy to use furthermore gives flexibility to coders by handling threads and API calls at the backend.
In firebase, we can use multiple types of authentications like a phone number, email, Facebook, Google and many more in the list.
Why Firebase Phone Authentication?
Phone authentication uses OTP or the SMS code which will be sent to the user’s phone. As we all know that sending SMS is not a free service.
Whereas firebase provides phone auth service at free of cost. Firebase phone authentication is not completely free but provides 10,000 free SMS verifications per month.
This is still not the stop however if you need more SMS verifications per month then you can pay a very little amount and get more SMS verifications.
Firebase provides an automatic and manual way to verify the OTP PIN. If the phone number is in the same device as we are trying to verify then you don’t have to enter the code manually however it detects automatically and verify the user.
As a developer, I must say firebase makes it so much easy to use phone number authentication.
.
Firebase phone Authentication android tutorial
We will send the SMS to our user to verify the phone number using firebase phone authentication.
Many people think that OTP or firebase phone authentication tutorial is a complex tutorial but it is not.
Phone Authentication main code contains 5 functions to complete the process.
Before we begin
1 – If you have not already added Firebase to your project, add first.
2 – Add firebase authentication dependencies by going to Tools => Firebase.

3 – Click on the Assistant => Authentication and select email and password authentication.
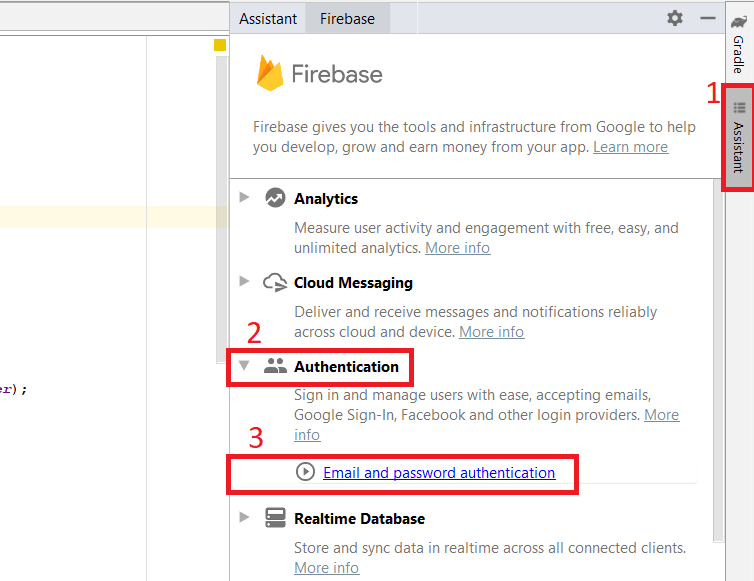
4 – First connect your app
5 – Click on the 2nd button to add the dependencies.

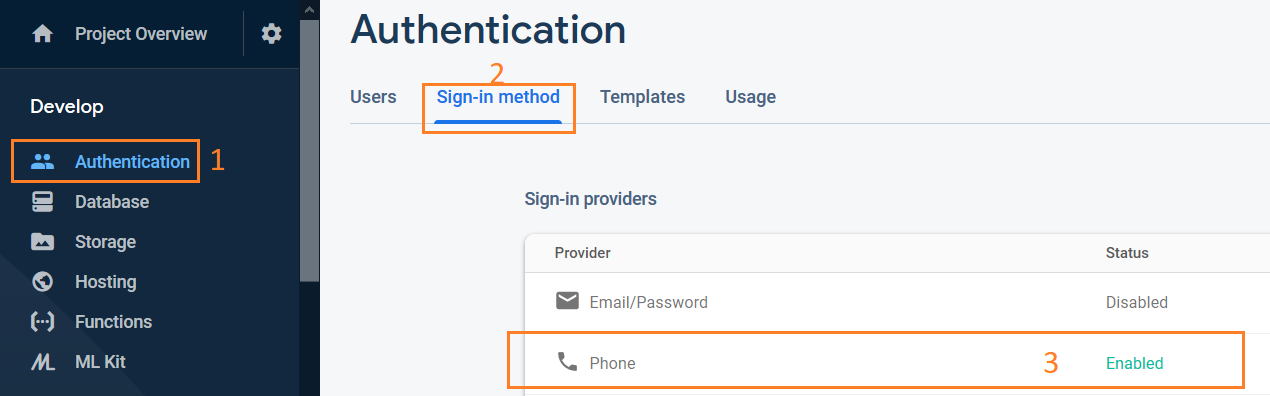
6 – When the basic setup has been ready and all the dependencies added successfully, Open Firebase Console
7 – Go to Authentication
8 – Select Sign-in method option
9 – Enable the Phone option from that and that’s it
Once everything has been setup then we will start designing and coding for phone authentication.
No 1 – Create Activities
In this tutorial, we need two activities. Firstly, we will get the phone number from the user and secondly, we will verify SMS or OTP send from firebase.
For the first activity, we have to create Sign-up or login Activity in which the user will enter the phone number. I already designed Login and Signup activities as shown in the tutorial.
For the second activity create a new activity in android and name it VerifyPhoneNo.
This activity will be used to send the verification code first. Then ask the user to enter the code OTP which is sent by SMS.
After verifying the OTP user will be redirected to Profile Screen or will see the error message.
Get VerifyPhoneNo Design CodeOpen the layout of verify phone number activity from the left side app->res->layout->activity_verify_phone_no.xml
After that click on the split icon from the right side.
First of all, change the main layout to ScrollView from constraint layout having width and height of match parent and vertical orientation.
<?xml version="1.0" encoding="utf-8"?>
<ScrollView xmlns:android="http://schemas.android.com/apk/res/android"
    xmlns:app="http://schemas.android.com/apk/res-auto"
    xmlns:tools="http://schemas.android.com/tools"
    android:layout_width="match_parent"
    android:layout_height="match_parent"
    android:background="@drawable/verify_activity"
    android:orientation="vertical"
    tools:context=".VerifyPhoneNo">
</ScrollView>
Now create a linear layout of vertical orientation with width and height of match parent.
<LinearLayout
        android:layout_width="match_parent"
        android:layout_height="match_parent"
        android:orientation="vertical">
</LinearLayout>
Subsequently, add the image view for the top and then create two text views for title and description
<ImageView
    android:layout_width="200dp"
    android:layout_height="200dp"
    android:layout_gravity="center"
    android:src="@drawable/bulls_rent_logo_transparent" />
<TextView
android:layout_width="match_parent"
android:layout_height="wrap_content"
android:fontFamily="@font/bungee"
android:text="Verify Phone No"
android:textAlignment="center"
android:textSize="30sp" /><TextView
android:layout_width="match_parent"
android:layout_height="wrap_content"
android:text="Enter verification code if not automatically authenticated."
android:textAlignment="center"
android:textSize="14sp" />Now create a new linear layout in between the last vertical layout and after the description.
<LinearLayout
    android:layout_width="match_parent"
    android:layout_height="wrap_content"
    android:layout_marginTop="120dp"
    android:orientation="vertical"
    android:padding="50dp">
</LinearLayout>
Lastly, create an Opt edit text, Verify Button and Progress bar for firebase phone authentication.
<EditText
    android:hint="Enter OTP"
    android:id="@+id/verification_code_entered_by_user"
    android:layout_height="wrap_content"
    android:layout_width="match_parent" />

    <Button
    android:background="#fece2f"
    android:id="@+id/verify_btn"
    android:layout_height="wrap_content"
    android:layout_marginTop="20dp"
    android:layout_width="match_parent"
    android:text="Verify" />

    <ProgressBar
    android:id="@+id/progress_bar"
    android:layout_gravity="center"
    android:layout_height="wrap_content"
    android:layout_marginTop="20dp"
    android:layout_width="wrap_content" />
After creating the design of VerifyPhoneNo Activity, we need to create hooks in VerifyPhoneNo.Java
verify_btn = findViewById(R.id.verify_btn);
phoneNoEnteredByTheUser = findViewById(R.id.verification_code_entered_by_user);
progressBar = findViewById(R.id.progress_bar);
No 2 – Get user’s phone number
So to start the process of verifying the phone number. Firstly we need to get the phone number of user and for that, we are using Sign-up screen for this tutorial.
I have designed both sign-in and sign-up screens so if you want the same design go and grab it.
Firstly, the user will have to enter the phone no in the Phone Number field below and on the click of the GO button. We will validate the fields and then call the verification activity to start verifying.

When the Go button will be pressed we will get the phone number and pass it to 2nd activity using Intent.
Code to call the 2nd activity and pass phone number in it.
//This function will execute when user click on Register Button
    public void registerUser(View view) {

        // Performing Validation by calling validation functions
        if (!validateName() | !validatePassword() | !validatePhoneNo() | !validateEmail() | !validateUsername()) {
            return;
        }

        //Get the Phone No from phone no field in String
        String phoneNo = regPhoneNo.getEditText().getText().toString();

        //Call the next activity and pass phone no with it
        Intent intent = new Intent(getApplicationContext(), VerifyPhoneNo.class);
        intent.putExtra("phoneNo", phoneNo);
        startActivity(intent);

    }
No 3 – Receive users phone in VerifyPhoneNo
To receive the phone no, we will use getIntent() method.
String phoneNo = getIntent().getStringExtra("phoneNo");Firebase OTP is not working
If your firebase otp is not working then please follow the instructions below. There are few new security policy related items added by Firebase after this tutorial uploaded. So, to use phone authentication we have to follow few new things.
- Change the sendVerificationCodeToUser() function as menthioned by defining varible of mAuth and then initilize it.
- Open Build.Gradle (app level)
- Update all the dependencies in the app level build.Gradle file
- Update the compileSdkVersion to latest (31)
- Update the targetSdkVersion to latest (31)
- Update the buildToolsVersion to latest (30.0.2)
- Now Open Project level Build.Gradle file and update all dependencies in it.
- Open Manifest file and set android:exported=”true” in the main <activity> like
-
<activity android:name=".Common.SplashScreen"
    android:exported="true">
    <intent-filter>
        <action android:name="android.intent.action.MAIN" />

        <category android:name="android.intent.category.LAUNCHER" />
    </intent-filter>
</activity>
-
- Add SHA-256 in the Firebase Console
- Open firebase console and select project
- Goto Project Settings and scroll to the bottom to add Fingerprints SHA1 and SHA-256
- Now to get both fingerprints, open Android Studio
- Click on the Gradle from the right most tab
- Select your Project and right click on it to see a menu
- Select Refresh and you will see Tasks in your project
- Open Task -> Android -> and double click on signing report to generate SHA1 and SHA-256 certificates
- add them in firebase.
- Open firebase console and select project
- Download latest google-services.json file and add in your project
- Select project from the left android studio project menu
- Paste the file inside app directory
- Add Safety Net
- Goto Firebase console -> select app -> settings -> Select App check from the horizontal menu ->
- Select on the app and It will open a safety check -> select the agreement checkbox and click add
- Clean and rebuild project.
No 4 – Send Verification Code
In this function, we will send the verification code to the users provided phone number.
This function must be called in onCreate function so the OTP SMS code can be sent automatically.
Call send verification code function from onCreate Method.
Create sendVerificationCodeToUser() function outside the onCreate() Method.
SendVerificationCodeToUser
private void sendVerificationCodeToUser(String phoneNo) {
        // [START start_phone_auth]
        PhoneAuthOptions options =
                PhoneAuthOptions.newBuilder(mAuth)
                        .setPhoneNumber("+92" + phoneNo)       // Phone number to verify
                        .setTimeout(60L, TimeUnit.SECONDS) // Timeout and unit
                        .setActivity(this)                 // Activity (for callback binding)
                        .setCallbacks(mCallbacks)          // OnVerificationStateChangedCallbacks
                        .build();
        PhoneAuthProvider.verifyPhoneNumber(options);
        // [END start_phone_auth]
    }
No 5 – Handle Verification Events
In this function, we will handle the possible events occurred while verifying the SMS code. There are 3 main possible scenarios that can be occurred while testing the SMS Code or the OTP.
It can not be empty and will @override two basic methods. Third method can be added manually which is onCodeSent.
private PhoneAuthProvider.OnVerificationStateChangedCallbacks mCallbacks =
    new PhoneAuthProvider.OnVerificationStateChangedCallbacks() {

    };
There are 3 main possible scenarios that can occurred while testing the SMS Code or the OTP.
a – Code Sent
a – Code Sent
This function will be executed by all means when the code has been sent. It contains the verification ID so if the verification is working automatically then we don’t need it.
Otherwise, if the user has to enter the code manually then we need this verification ID to match it with users provided OTP code.
We will take a global variable of String type and initialized it the ID generated by the system.
@Override
public void onCodeSent(String s, PhoneAuthProvider.ForceResendingToken forceResendingToken) {
    super.onCodeSent(s, forceResendingToken);
	//Get the code in global variable
    verificationCodeBySystem = s;
}
b – Verification Completed
This is the function performed the automatic verification. It can be called only when the verification is being performed automatically.
Therefore, we will simply pass the code to verifyCode function we created below and set the visibility of the scroll bar to view.VISIBLE.
@Override
public void onVerificationCompleted(PhoneAuthCredential phoneAuthCredential) {

    String code = phoneAuthCredential.getSmsCode();
    if (code != null) {
        progressBar.setVisibility(View.VISIBLE);
        verifyCode(code);
    }
}
c – Verification Failed
It will be executed when the verification will be failed. So to handle that we will simply show the error message to the user.
@Override
public void onVerificationFailed(FirebaseException e) {
  Toast.makeText(VerifyPhoneNo.this, e.getMessage(), Toast.LENGTH_SHORT).show();
}
With all the @override funtions this function will be like.
private PhoneAuthProvider.OnVerificationStateChangedCallbacks mCallbacks =
        new PhoneAuthProvider.OnVerificationStateChangedCallbacks() {

    @Override
    public void onCodeSent(String s, PhoneAuthProvider.ForceResendingToken forceResendingToken) {
        super.onCodeSent(s, forceResendingToken);
        verificationCodeBySystem = s;
    }

    @Override
    public void onVerificationCompleted(PhoneAuthCredential phoneAuthCredential) {

        String code = phoneAuthCredential.getSmsCode();
        if (code != null) {
            progressBar.setVisibility(View.VISIBLE);
            verifyCode(code);
        }
    }

    @Override
    public void onVerificationFailed(FirebaseException e) {
        Toast.makeText(VerifyPhoneNo.this, e.getMessage(), Toast.LENGTH_SHORT).show();
    }
};
No 6 – Verify Code
It will be used to verify the credentials entered by the user furthermore match them with the system generated verification ID.
Then we will call the last function to act on the credentials.
private void verifyCode(String codeByUser) {

    PhoneAuthCredential credential = PhoneAuthProvider.getCredential(verificationCodeBySystem, codeByUser);
    signInTheUserByCredentials(credential);

}
No 7 – Sign In The User By Credentials
It will be called from the verifyCode to either let the user sign in or show the error message based on the credentials.
private void signInTheUserByCredentials(PhoneAuthCredential credential) {

FirebaseAuth firebaseAuth = FirebaseAuth.getInstance();

firebaseAuth.signInWithCredential(credential)
        .addOnCompleteListener(VerifyPhoneNo.this, new OnCompleteListener<AuthResult>() {
            @Override
            public void onComplete(@NonNull Task<AuthResult> task) {

                if (task.isSuccessful()) {

                    Toast.makeText(VerifyPhoneNo.this, "Your Account has been created successfully!", Toast.LENGTH_SHORT).show();

                    //Perform Your required action here to either let the user sign In or do something required
                    Intent intent = new Intent(getApplicationContext(), Login.class);
                    intent.setFlags(Intent.FLAG_ACTIVITY_NEW_TASK | Intent.FLAG_ACTIVITY_CLEAR_TASK);
                    startActivity(intent);

                } else {
                    Toast.makeText(VerifyPhoneNo.this, task.getException().getMessage(), Toast.LENGTH_SHORT).show();
                 }
            }
        });
}
No 8 – Handle Manual Verification
Suppose a user is using the app and request the code. The phone number provided is on another device and the app is installed on another then auto verification can not be performed.
So for that, we have to let the user enter the code manually. After entering the code user will click on the verify button to start the verification process.
To incorporate manual action we just have to get the OTP code entered by the user furthermore send it to verifyCode() on the click of Verify Button.
verify_btn.setOnClickListener(new View.OnClickListener() {
    @Override
    public void onClick(View view) {

        String code = phoneNoEnteredByTheUser.getText().toString();

        if (code.isEmpty() || code.length() < 6) {
            phoneNoEnteredByTheUser.setError("Wrong OTP...");
            phoneNoEnteredByTheUser.requestFocus();
            return;
        }
        progressBar.setVisibility(View.VISIBLE);
        verifyCode(code);
    }
});
Get Complete Source code for Bull’s Rent App
To learn in detail just follow our Youtube tutorial..
Android Related Videos
- Design a Modern Dashboard
- Material Design Login Screen with Shared Animations
- Create a Navigation Drawer Material Design in 2020
- Design Responsive Android App to fit all screen sizes
Related Articles that you might want to check out.
- Create a new project in android studio for beginners?
- How to create an Account on Fiverr and start earning?
- Create a Gig on Fiverr and start selling specific services.
- How To Start Blogging and Make Money?
Our Projects Make Us Proud


